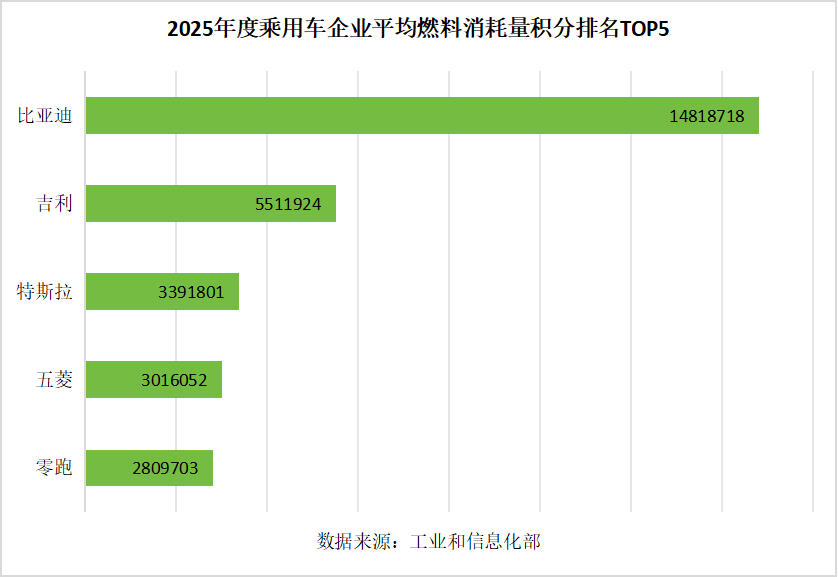
王虹、邓煜斩获2026年菲尔兹奖 实现中国数学领域零的突破
2026-07-24
| 1. package bookstore; 2. import javax.servlet.http.HttpSessionBindingListener; 3. import javax.servlet.http.HttpSessionBindingEvent; 4. import java.sql.*; 5. import java.text.SimpleDate表单at; 6. import java.util.Date; 7. 8. public class User implements HttpSessionBindingListener 9. { 10. … 11. private String loginDatetime;//用户登录时间 12. … 13. public void valueBound(HttpSessionBindingEvent event) 14. { 15. Connection conn = null; 16. String sqlStr = "insert into T_LOGIN_LOG(ID, USER_ID, DT_LOGIN) " + 17. " values(SEQ_LOGIN_LOG_ID.NEXTVAL,?,? )"; 18. try 19. { 20. conn = DBConnection.getConnection(); 21. PreparedStatement pStat = conn.prepareStatement(sqlStr); 22. loginDatetime = getCurrDatetimeStr(); //当前时间串 23. pStat.setString(1, userId); 24. pStat.setString(2, loginDatetime); 25. pStat.executeUpdate(); 26. 27. } catch (SQLException e) 28. { 29. throw new RuntimeException( 30. "用户登陆日志写入出错"); 31. } finally 32. { 33. try 34. { 35. if (conn != null) 36. { 37. conn.close(); 38. } 39. } catch (SQLException ex) 40. { 41. ex.printStackTrace(); 42. } 43. } 44. } 45. 46. public void valueUnbound(HttpSessionBindingEvent event) 47. { 48. Connection conn = null; 49. String sqlStr = " update T_LOGIN_LOG set DT_LONOUT = ? " + 50. " where USER_ID=? and DT_LOGIN = ?"; 51. try 52. { 53. conn = DBConnection.getConnection(); 54. PreparedStatement pStat = conn.prepareStatement(sqlStr); 55. pStat.setString(1, getCurrDatetimeStr()); 56. pStat.setString(2, userId); 57. pStat.setString(3, loginDatetime); 58. pStat.executeUpdate(); 59. 60. } catch (SQLException e) 61. { 62. throw new RuntimeException( 63. "用户退出日志写入出错"); 64. } finally 65. { 66. try 67. { 68. if (conn != null) 69. { 70. conn.close(); 71. } 72. } catch (SQLException ex) 73. { 74. ex.printStackTrace(); 75. } 76. } 77. } 78. 79. //获取当前时间字串,以yyyyMMddHHmmss格式返回,如20050505010101 80. private static String getCurrDatetimeStr() 81. { 82. SimpleDate表单at sdf = new SimpleDate表单at("yyyyMMddHHmmss"); 83. return sdf.表单at(new Date()); 84. } 85. } |
valueBound()方法向T_LOGIN_LOG表插入一条登录日志,在valueUnbound()方法中更新日志表的退出时间,此外第80~84行提供了一个获取当前时间串的方法getCurrDatetimeStr(),通过该方法获取登录和退出时间点的时间字符串。
下面通过描述用户登录系统直到退出时所经历的步骤说明程序如何记录用户的登录和退出时间的:
1.用户通过login.jsp输入密码登录后,程序转向switch.jsp控制页面。
2.在switch.jsp中,我们通过session.setAttribute("ses_userBean", userBean)方法将User.java类的对象userBean绑定到session中。
3.此时userBean对象的HttpSessionBindingListener接口方法valueBound()被调用,向T_LOGIN_LOG表插入一条登录日志。
4.switch.jsp转向welcome.jsp页面。
5.用户点击welcome.jsp页面中的链接退出系统时,转向quit.jsp页面。
6.quit.jsp调用session.invalidate()方法,userBean对象从session中清除。
7.此时userBean对象的HttpSessionBindingListener接口方法valueUnbound()方法被调用,更新日志的退出时间,关闭浏览器窗口。
HttpSessionBindingListener接口是Web容器的事件接口,实现接口的类在某个事件发生时自动被调用,Web容器有多个这样的事件接口,它们分别是:
·ServletContextListener 接口:Web容器启动和销毁的事件处理接口,接口中定义了两个方法。
·ServletContextAttributeListener接口:Web上下文属性发生更改时的事件处理接口。
·HttpSessionListener接口:Session创建和销毁事件的事件处理接口。
·HttpSessionAttributeListener接口:Session会话中属性对象更改的事件处理接口,该接口和我们在前面使用的HttpSessionBindingListener接口相似。
此外在J2EE1.4中还提供了另外两个事件处理接口,它们是:
·ServletRequestListener接口:Request请求对象创建和销毁事件处理接口。
·ServletRequestAttributeListener接口:更改Request中属性对象时的事件处理接口。
程序部署
在Web程序开发完成后,我们开始着手程序部署的工作,我们希望将这个Web应用程序部署到Tomcat5.0的Web应用服务器中。
首先我们设置Web应用程序的默认首页,然后再将整个Web程序打成一个WAR档案文件包。
1.设置默认访问的页面,双击工程窗格中的webModule节点,JBuilder在内容窗格显示如下的页面:

图 26 设置Web程序默认访问的页面
点击Welcome files列表右边的Add…按钮,在弹出的对话框中录入login.jsp并按确定按钮,将login.jsp页面作为默认页面,这样web.xml部署描述文件中将新增以下粗体的部署信息:
代码清单 19 Web应用程序默认页面
1. …
2. <web-app>
3. <display-name>webModule</display-name>
4. <welcome-file-list>
5. <welcome-file>login.jsp</welcome-file>
6. </welcome-file-list>
7. …
8. </web-app>
当用户在URL中没有指定具体的访问文件名时,Web容器自动查看URI下是否有login.jsp文件,如果直接调出这个文件。
2.在工程窗格中的资源树中右击webModule节点,Properties…->Build->在Build设置面中,将Build Web archive设置为When building project or module选项,如下图所示:
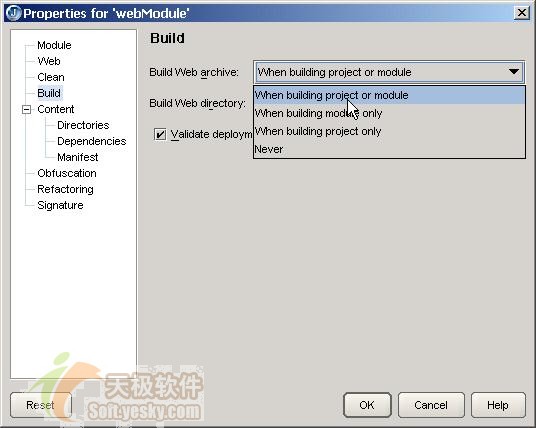
图 27 设置在Rebuild工程或Web模块时创建WAR档案文件
3.在工程窗格中右击chapter13.jpx,在弹出的菜单中选择Rebuild编译整个工程。
4.编译完成后,在工程根目录下将产生一个webModule.war文件。
5.拷贝webModule.war文件至<JBuilder2005安装目录>/thirdparty/jakarta-tomcat-5.0.27/webapps目录下。
这样就完成Web应用程序的部署了,下面我们启动Tomcat 5.0 Web应用程序服务器,并访问刚才部署的webModule.war应用程序。
1.双击<JBuilder2005安装目录>/thirdparty/jakarta-tomcat-5.0.27/bin下的startup.bat启动Tomcat 5.0 Web应用服务器(请保证这时JBuilder中没有运行Web应用程序,以免冲突)。
2.打开IE,键入http://localhost:8080/webModule,将正确访问到刚才部署的Web应用程序,如下图所示:
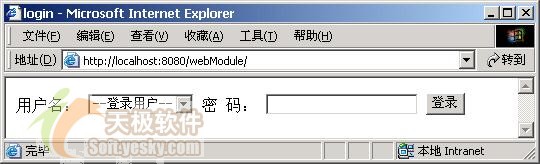
图 28 部署后login.jsp的访问效果
Tomcat 服务器默认工作于8080端口,所以在机器名后需要添加端口号,可以通过更改Tomca位于conf目录下的server.xml配置文件可以更改这个端口号。
由于我们的web应用程序的WAR文件名为webModule.war,web服务器启动后,会自动将WAR文件解压到webModule目录下,所以必须通过http://localhost:8080/webModule访问。此外,由于默认访问页面为login.jsp,所以没有指定具体的页面时,login.jsp页面被调用访问。
评论 {{userinfo.comments}}
{{child.content}}

 {{money}}元


{{question.question}}
提交